Getting started with teletherapy.io is easy.
This document will walk you thru the following 3-steps in detail:
- Step 1 – How to Configure your Practice Settings
- Step 2 – Maximize your Client Management Services
- Step 3 – Using Teletherapy.io to Manage your Practice
Step 1 – Configure Your Settings
Work Schedule | Locations | Services | Clinicians | Payment
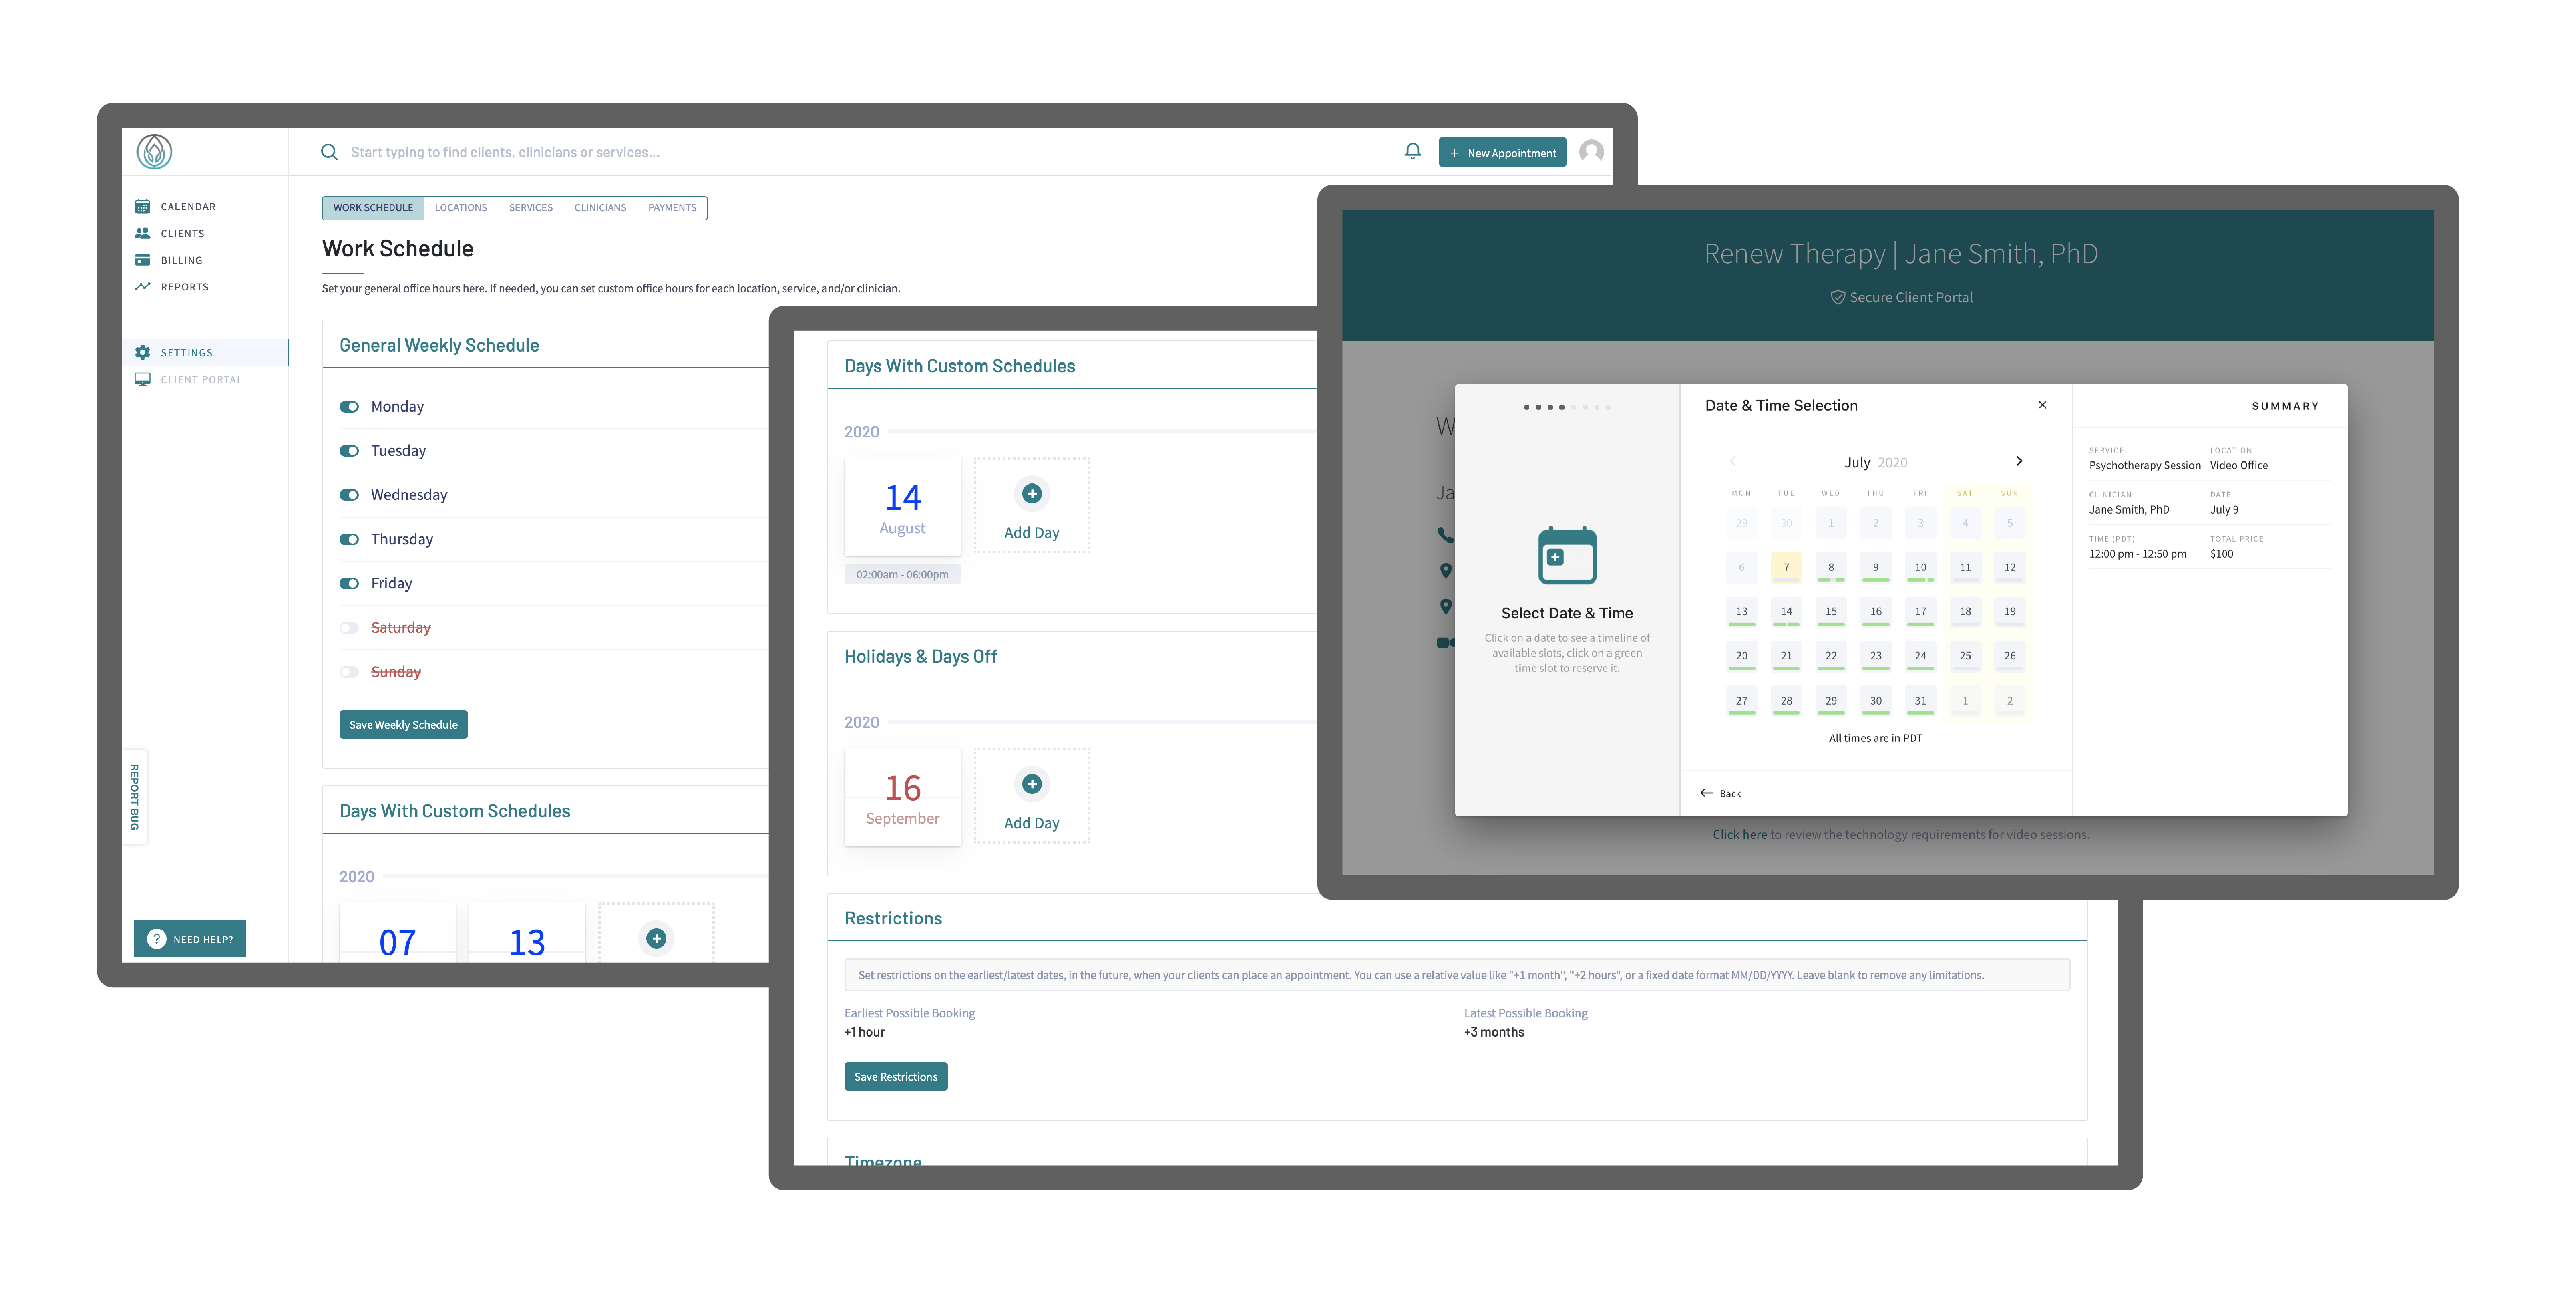
Work Schedule
Set your general office hours in the Admin Dashboard > Settings > Work Schedule. Then add any days with custom hours or holidays you want off. These settings will restrict clients from booking these dates/times online.
You can also restrict the earliest/latest times in the future clients can book or cancel an appointment online. For example, if you don’t want clients to book or cancel appointments within 24 hours you can set that here. Note: Default is set to allow bookings +1 hour prior and no later than +3 months out. The default cancellation window is set to 24 hours.
Need more customization? Set custom schedules for a specific location, service, and/or clinician in the settings for each of these sections. Please note the hierarchy of the calendar schedule system (top – to bottom) listed below:
- Custom Date schedule for clinician
- Custom Date schedule for service
- Custom Date schedule for location
- Custom Date schedule for general office
- Clinician Custom Schedule
- Service Custom Schedule
- Location Custom Schedule
- General Schedule
Example: A custom schedule set for a specific Clinician will override the general schedule.
NEW! Google Calendar Sync: Connect your Google account to teletherapy.io to sync your calendars. Choose to Sync your Google Calendar to your teletherapy.io Calendar or vice versa. Visit Calendar to learn more.
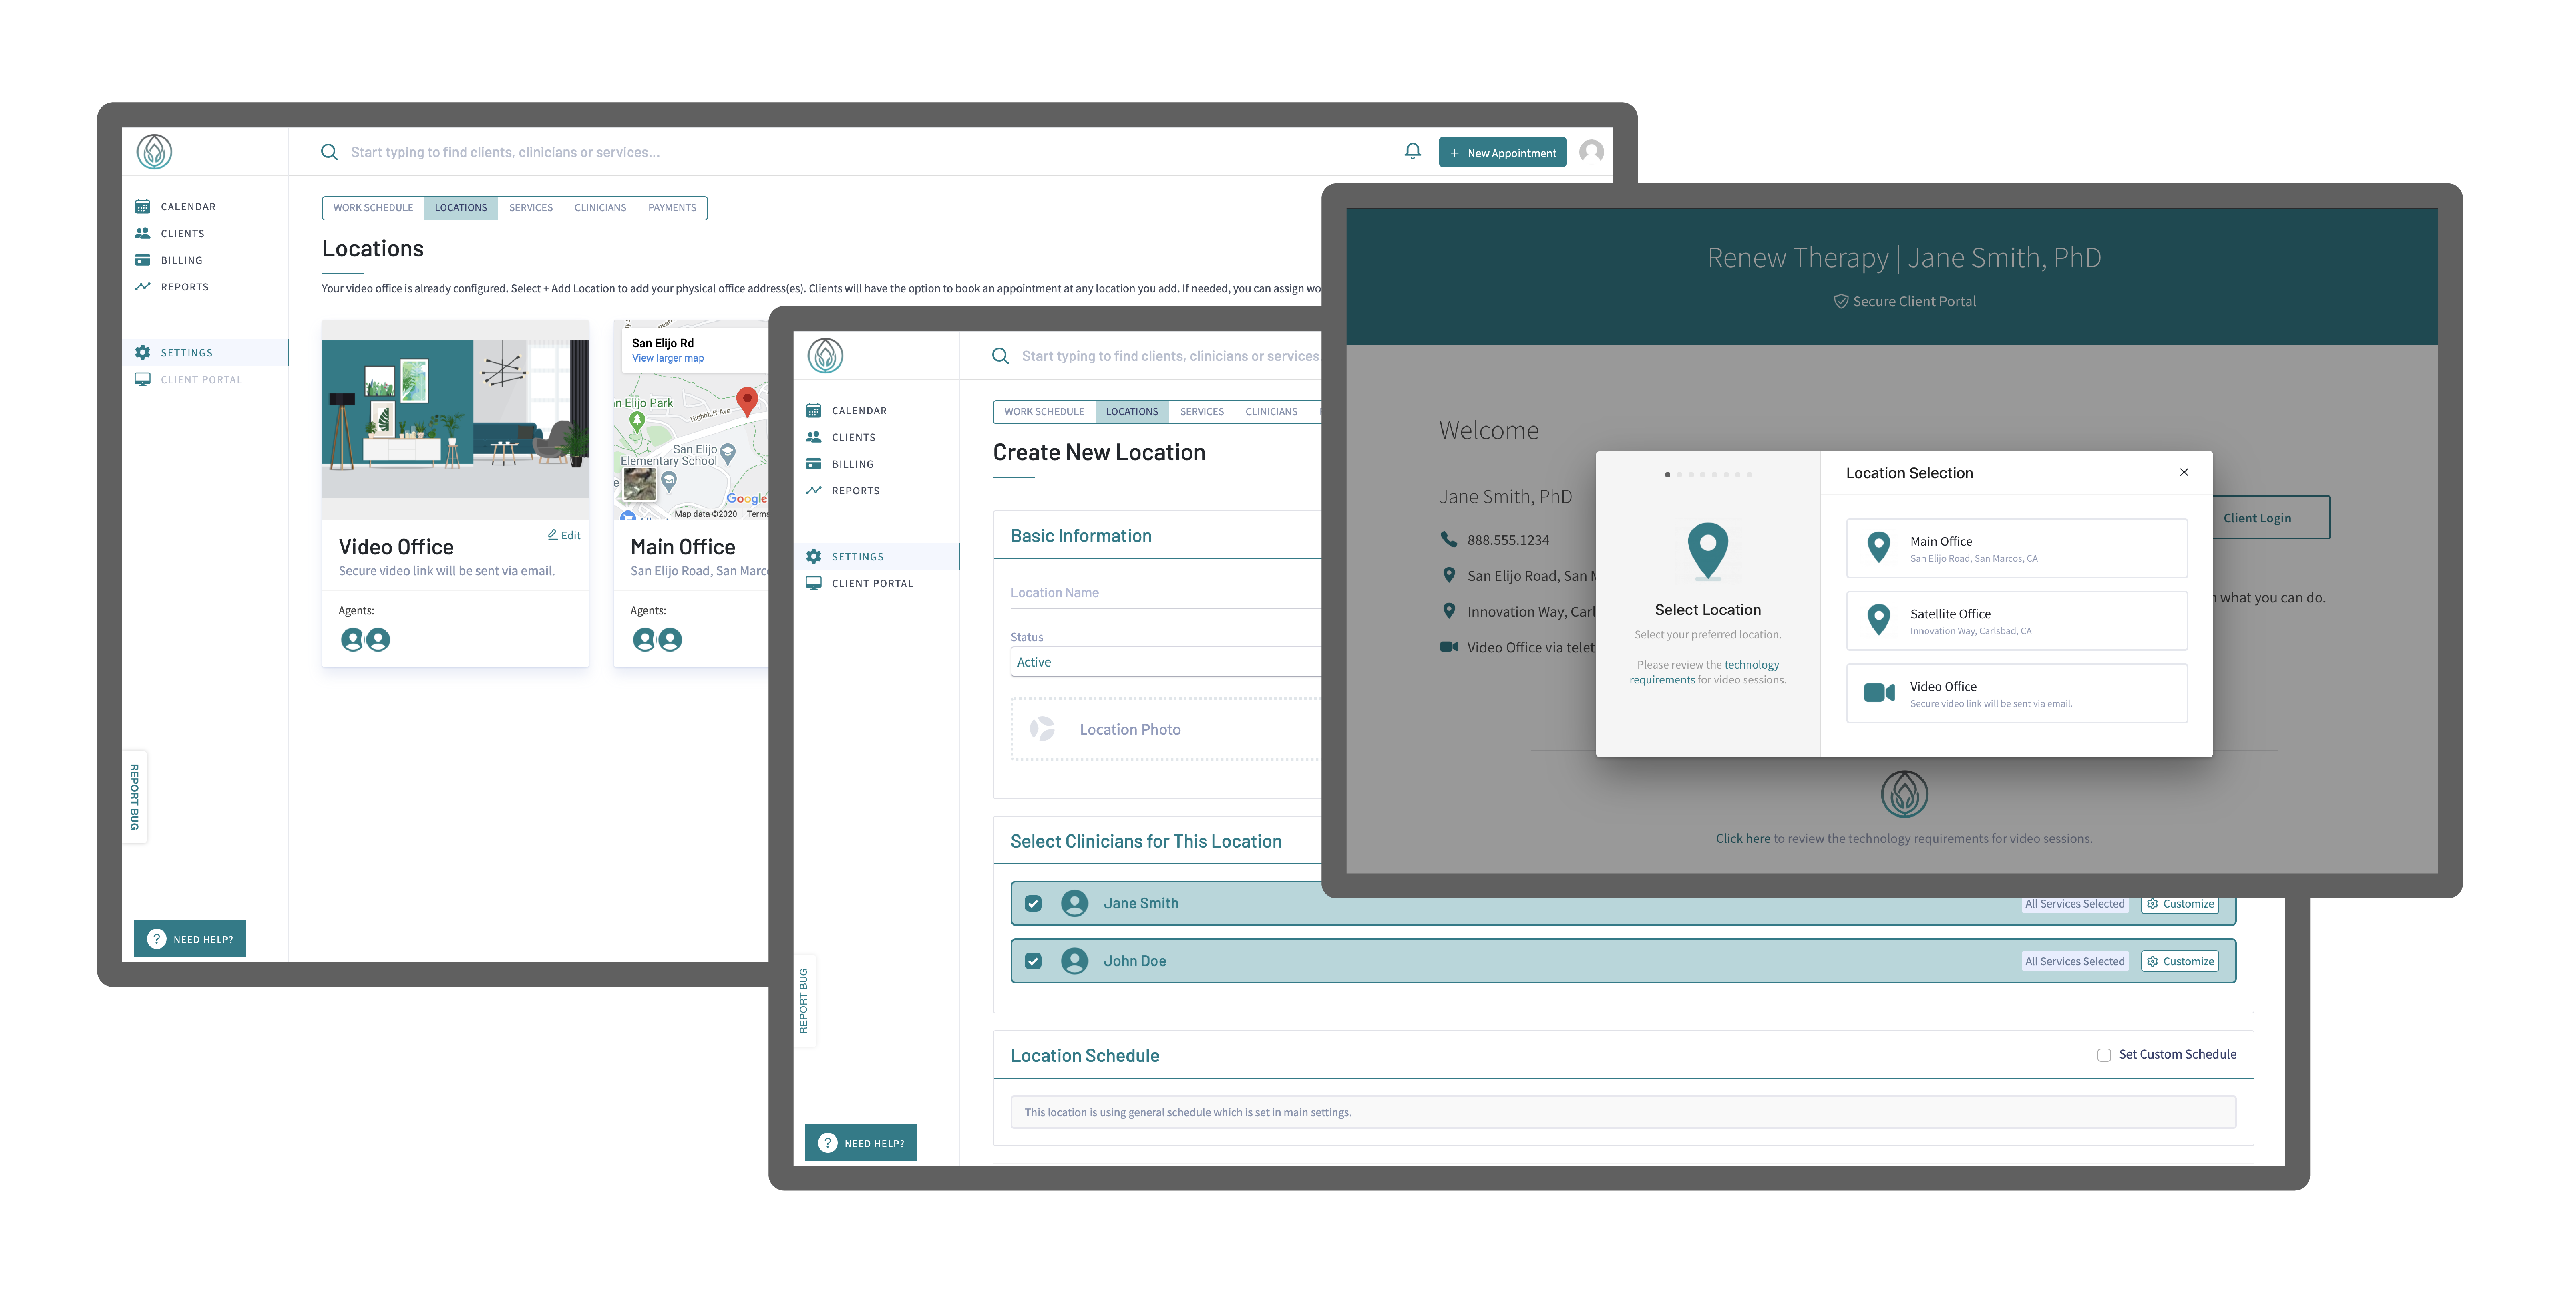
Locations
Your Video Office is already configured. Clients will automatically be emailed a secure video link when they book an appointment at your Video Office location. To adjust your Video Office hours or to assign a clinician and/or service to this location go to your Admin Dashboard > Settings > Locations > Video Office.
To add your in-office appointments to this platform select + Add Location and include your physical office address(es). Clients will have the option to book an appointment online at any location you add. If desired, you can assign custom schedules, clinicians, and/or services for each location.
Tip: Add “Place of Service Code” to each location for inclusion on Invoices.
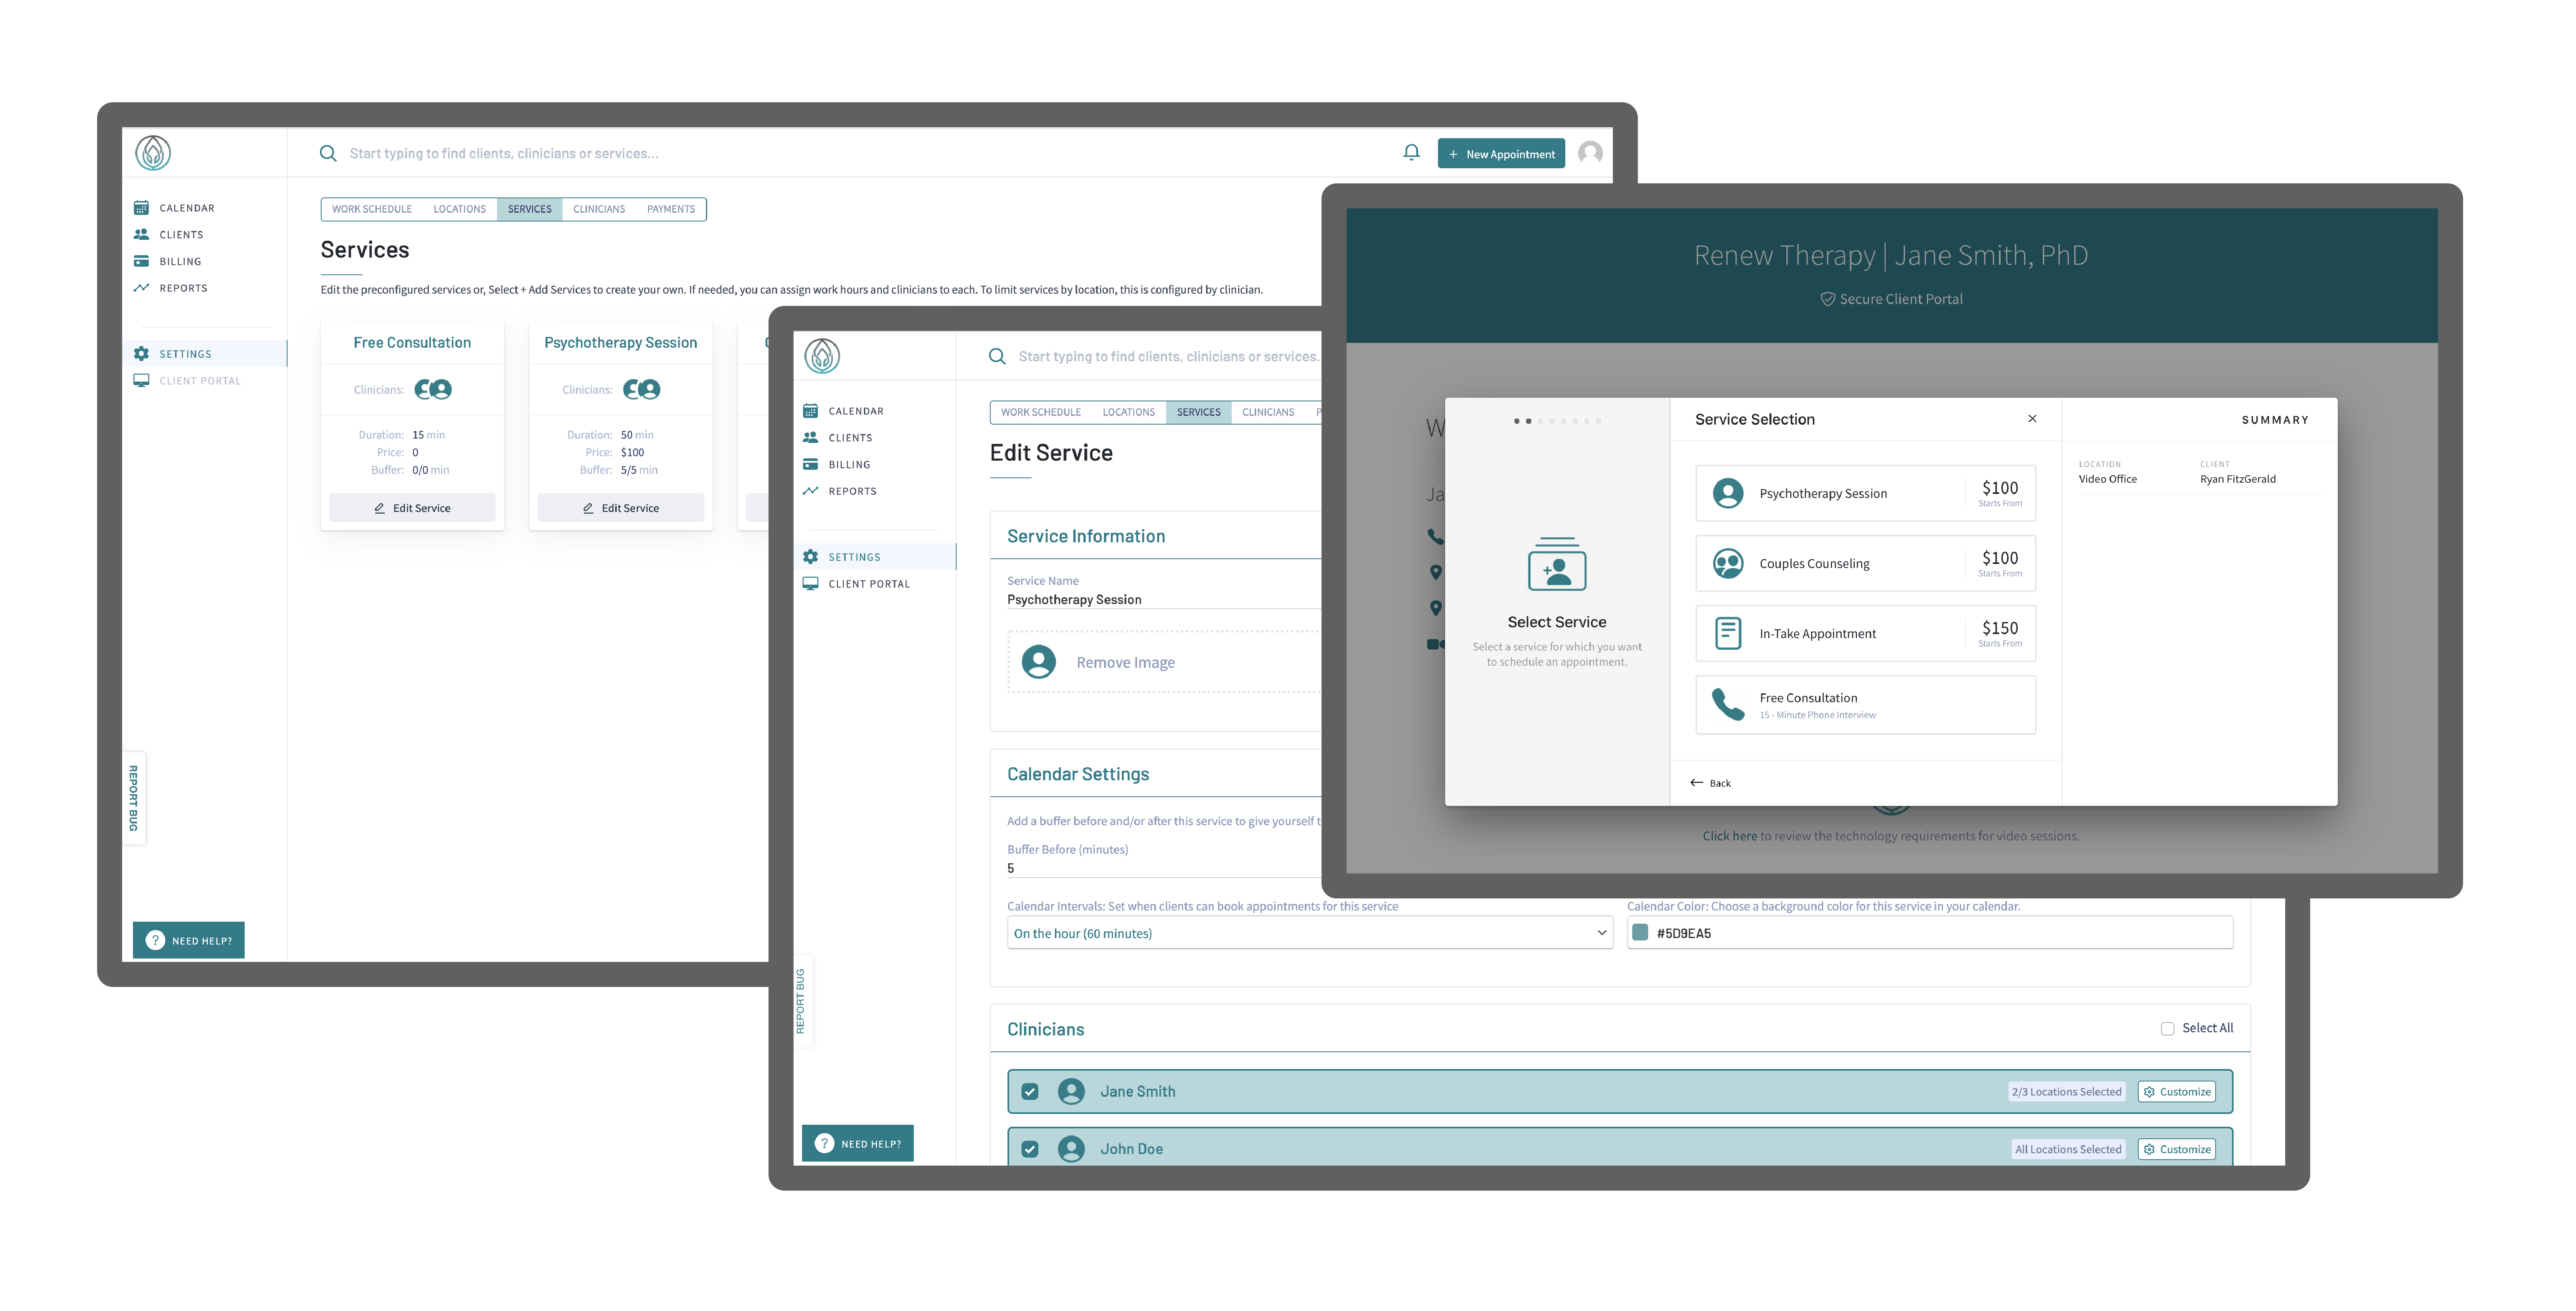
Services
Your account is populated with example services. To tailor these services to your practice go to your Admin Dashboard > Settings > Services > Edit Service. Or select + Add Service to create a new one. Each service requires a name, price, and duration. You can also restrict services by location or clinician.
Control the timing between appointments by setting a buffer before and/or after each service. The buffer for default services is set to 5 minutes before and after each appointment. Use Calendar Intervals to control your calendar layout and only accept appointments on the hour (60 minutes), half-hour (30 minutes), or quarter-hour (15 minutes). Or, simply allow clients to book appointments according to the service duration you set for each service.
Note: In Settings > Services you will see a service called “Cancellation Fee.” This service is hidden from your Client Portal. To set your cancellation fee, simply Edit this service to reflect your desired Service Price. Then, if you have a late-cancellation or no-show, do not cancel the appointment, simply change the service to “Cancellation Fee” instead. This will remove the appointment from your calendar and allow your billing and client invoices to reflect the proper charge and description.
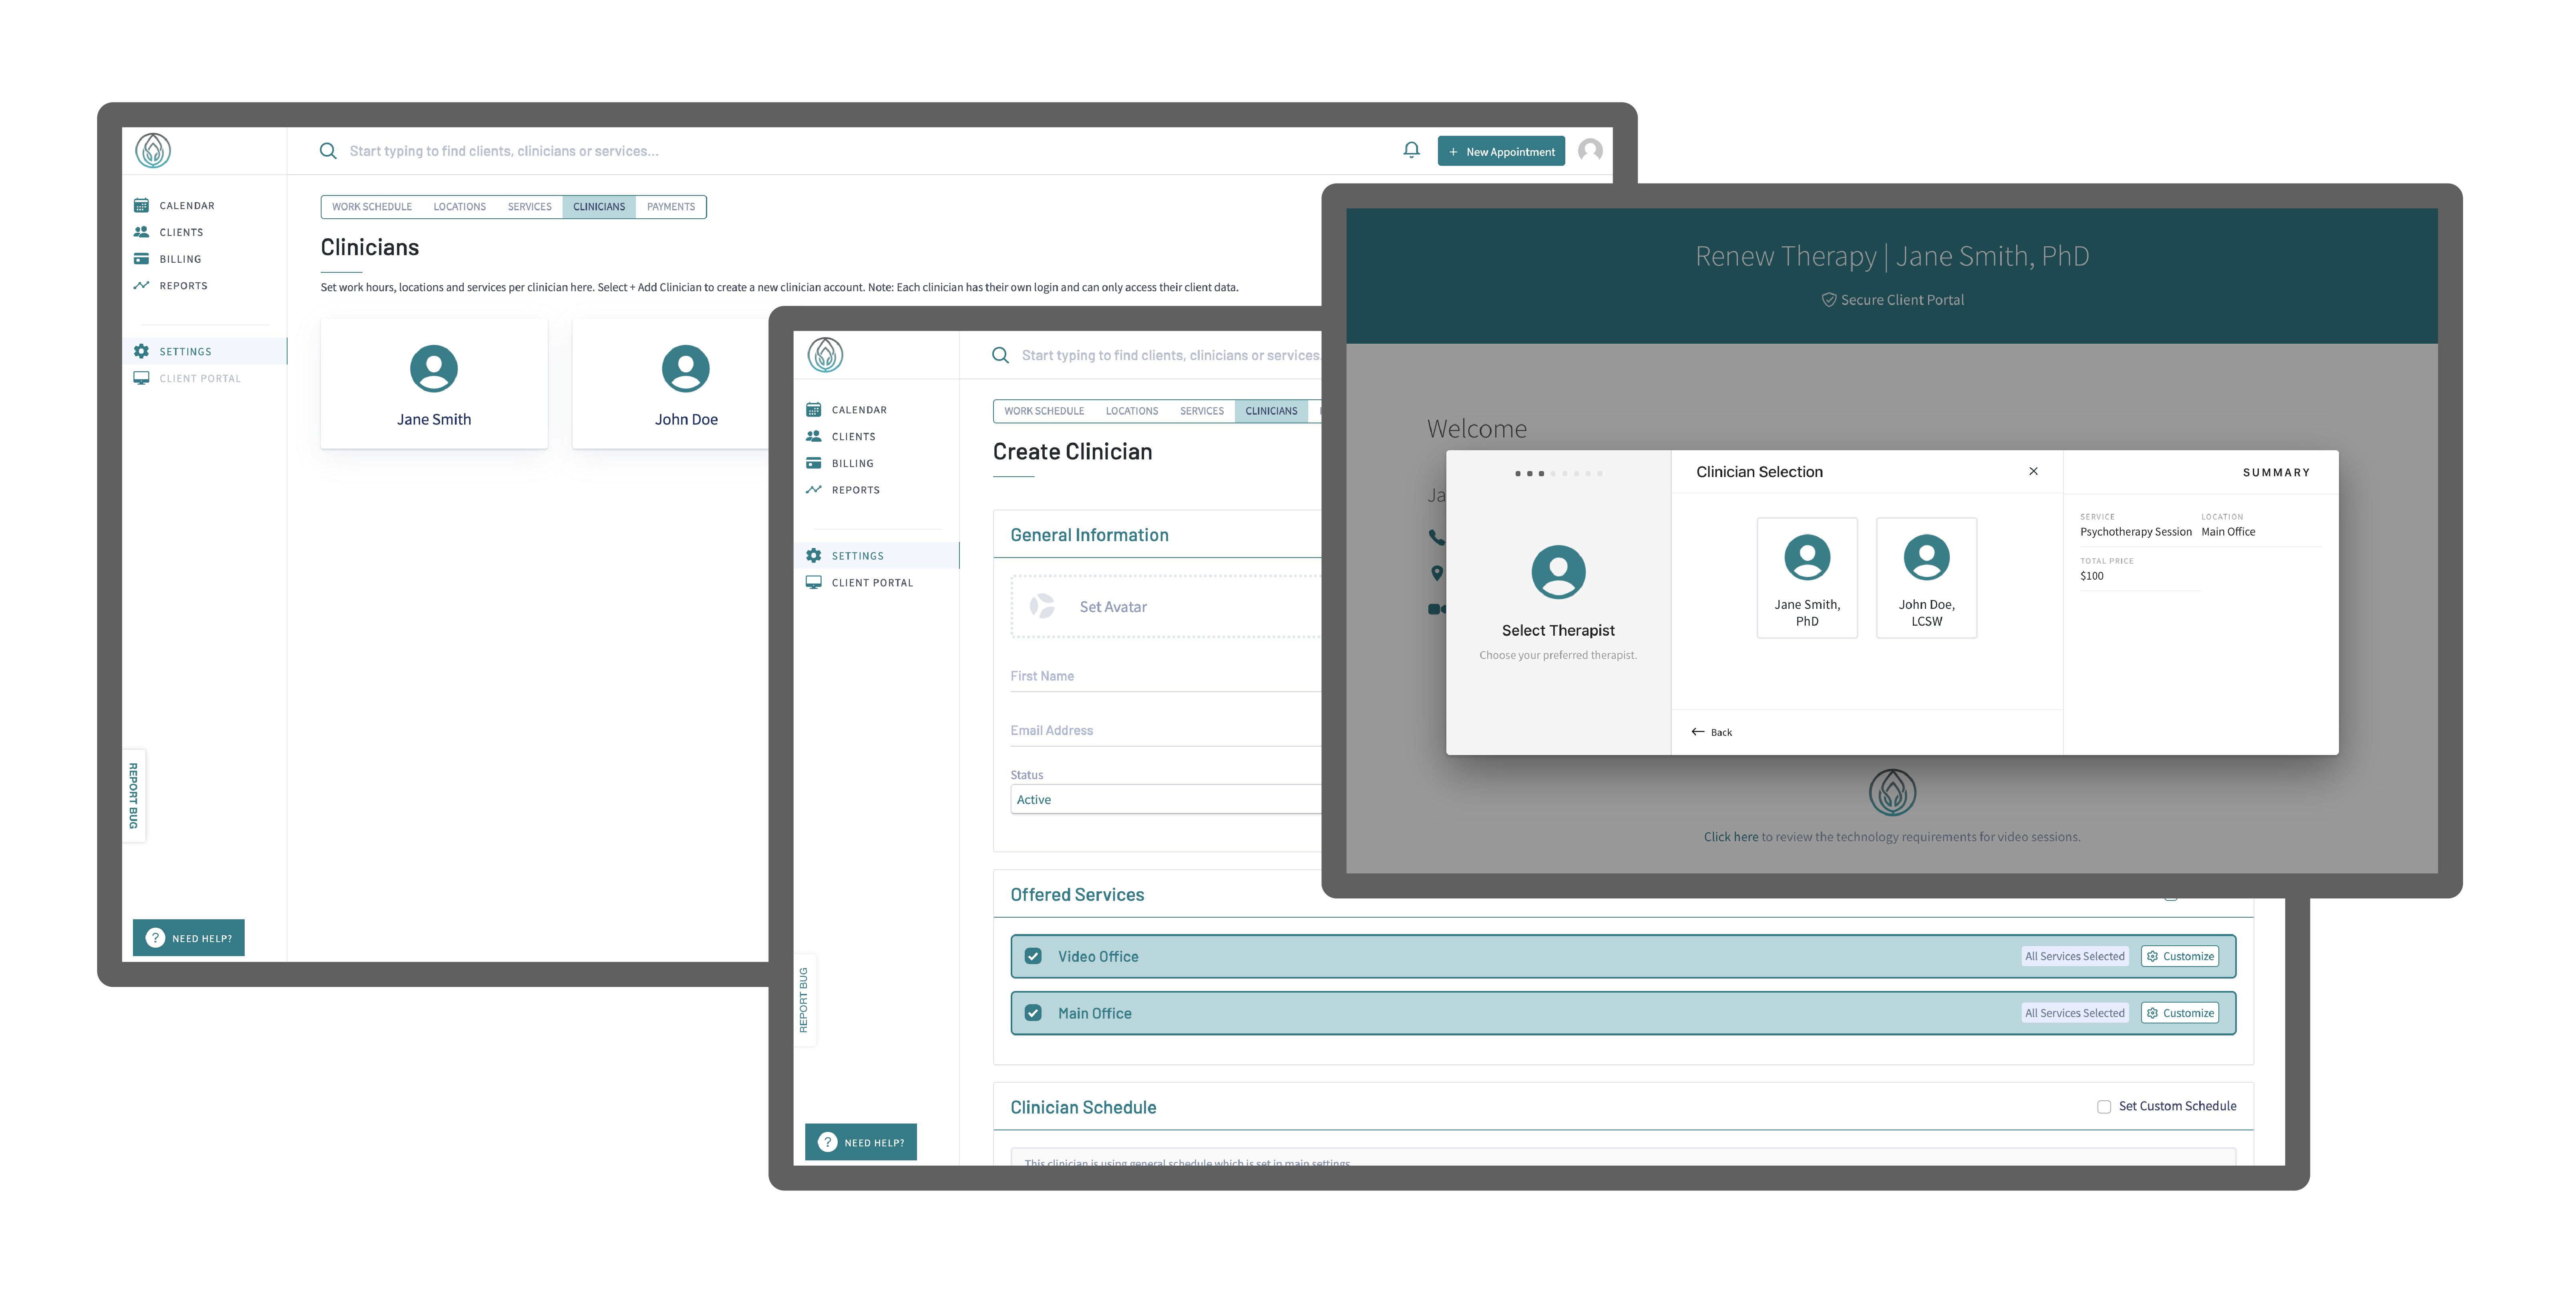
Clinicians
Designed from the get-go to handle group practices, the teletherapy.io platform offers a diverse set of features for Clinics.
The account that first launches the platform is set as “Therapist Admin.” The Therapist Admin has access to all account details and is responsible for ensuring any staff that has access to this account has been trained in HIPAA standards and best practices. Note: Only the therapist admin on the account can add/delete new Clinicians, Locations, Services, as well as view a Performance Summary of the practice as a whole.
To add a clinician to your account go to Admin Dashboard > Settings > Clinicians > + Add Clinician. Once a new clinician is added they will receive an email instructing them to create a password, as well as a quick overview of their available features. Each clinician on the account will have their own simplified Clinician Dashboard, where they can view their own client records and set their own schedules. When booking an appointment online, clients will only be able to schedule appointments with clinicians that are assigned to the location and/or service they select.
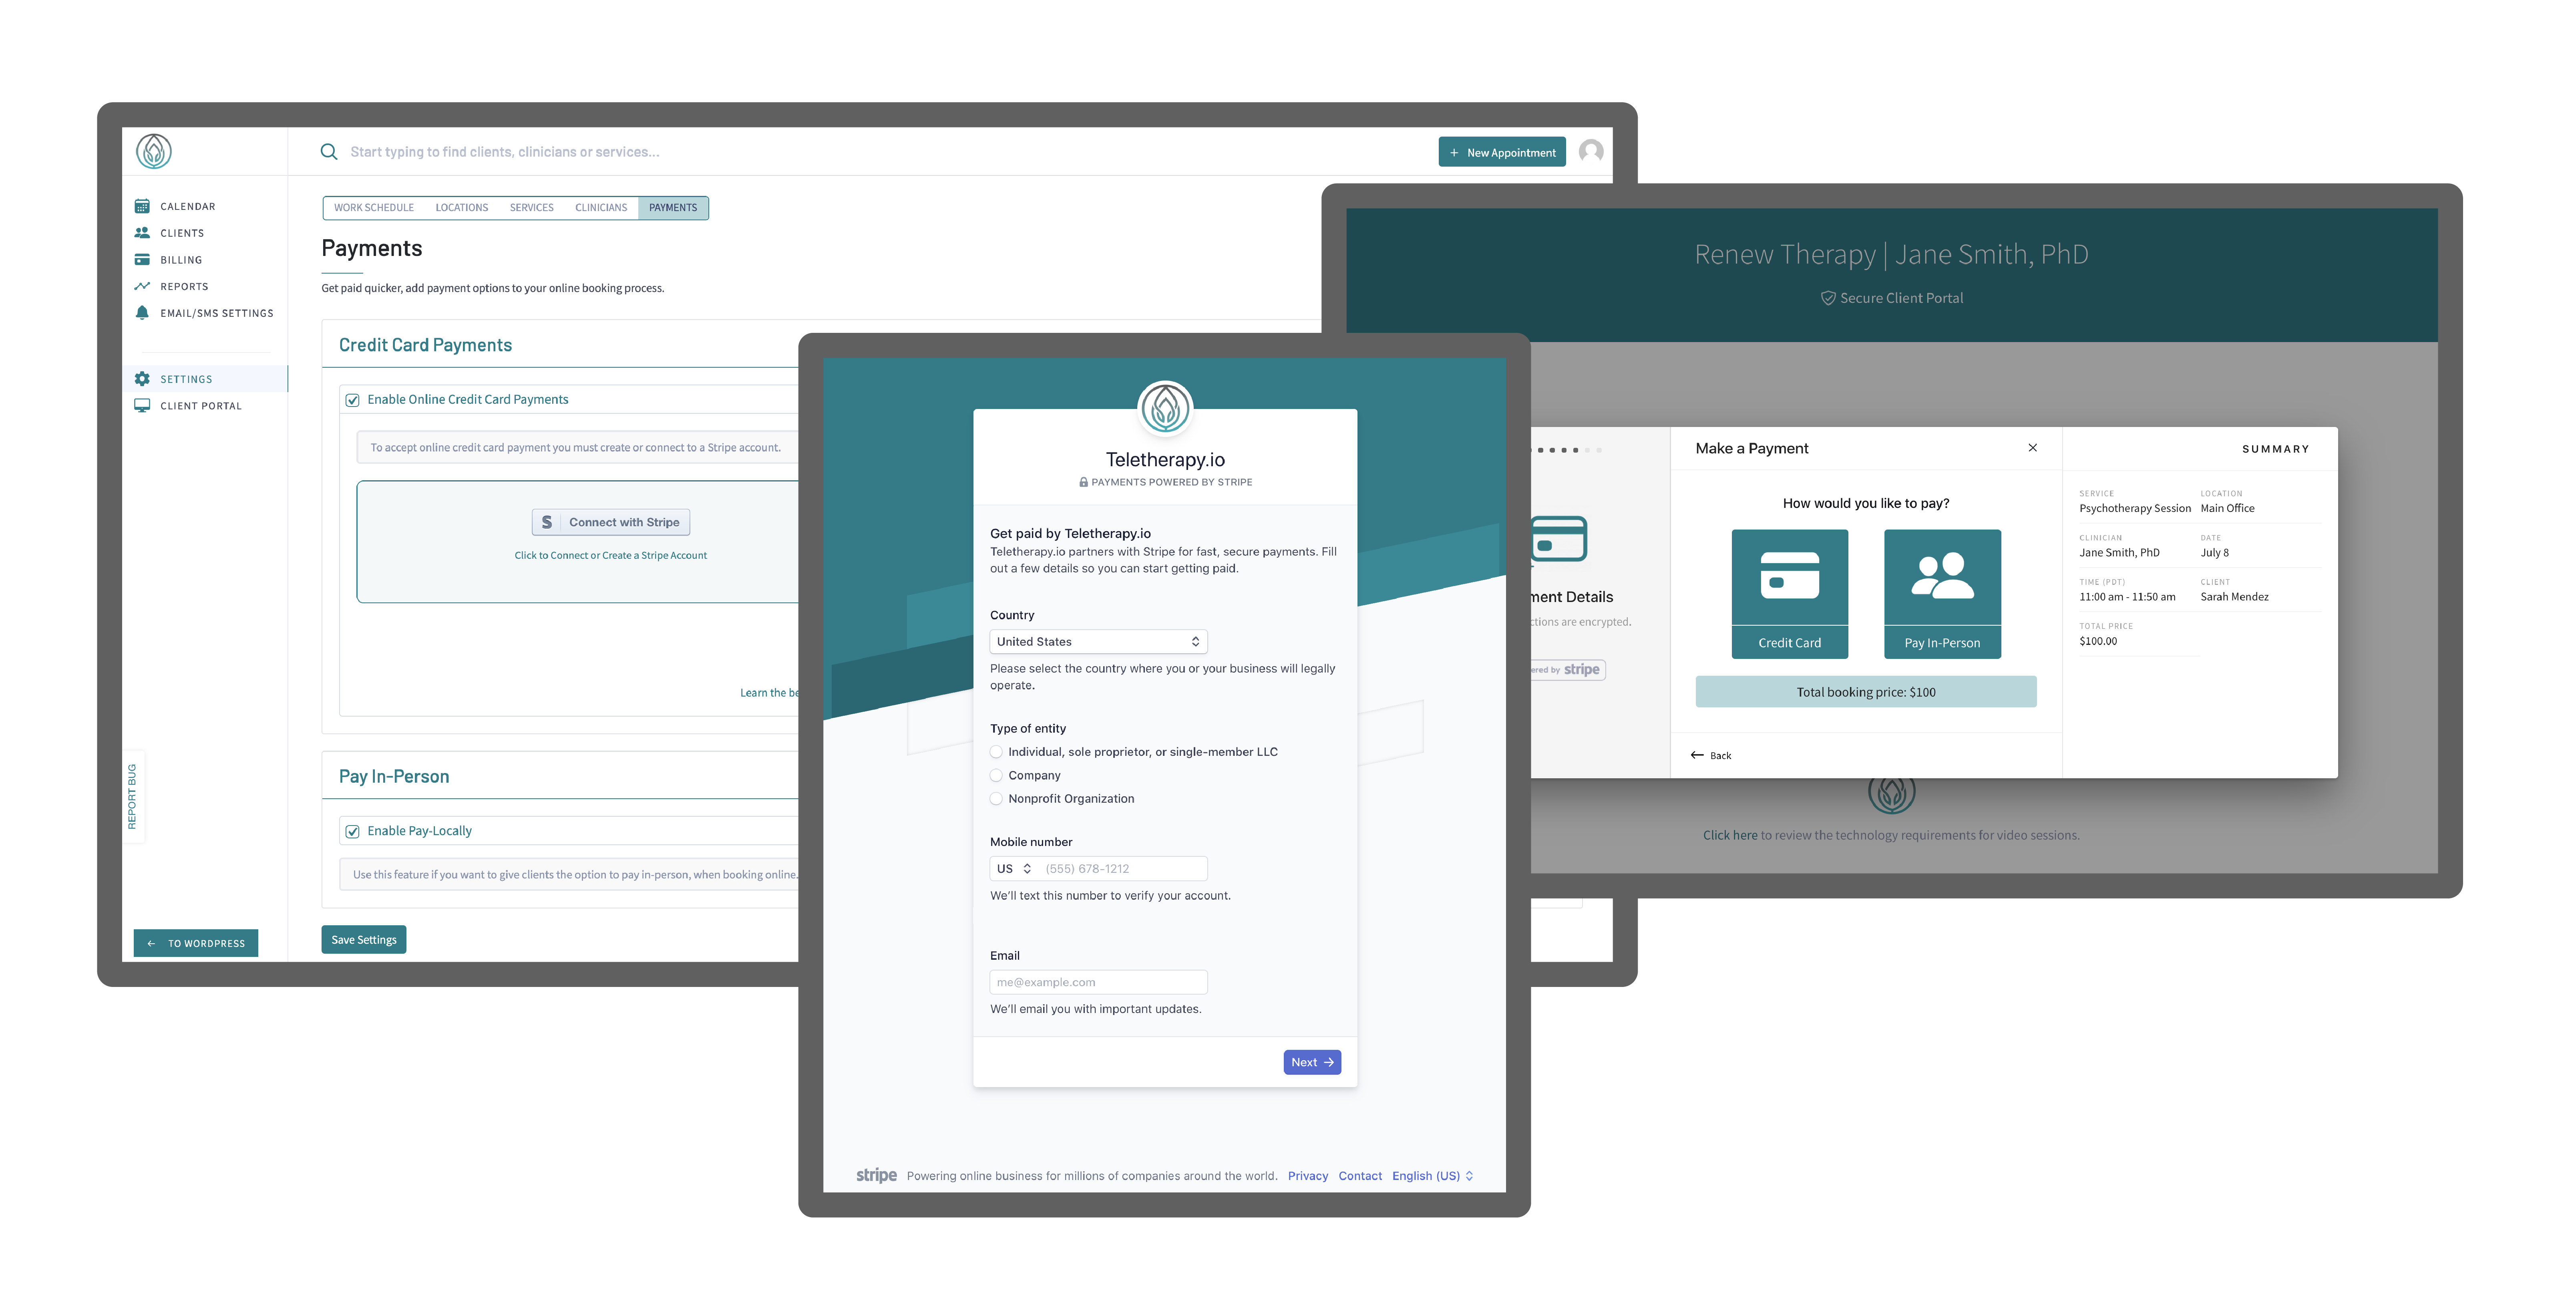
Payments
To accept credit card payments online you will need to connect to Stripe, our certified PCI compliant service provider. Once connected, online payments will be seamlessly integrated into the teletherapy.io platform. Clients will be able to enter credit card details when booking appointments online as well as add their credit card details via the Secure Client Portal. You can now give clients the option to pay in person or require a credit card to reserve an appointment online.
To set up a Stripe account simply go to Settings > Payments > Connect with Stripe. You will be asked to enter a few details about your business, as well as enter your account where you would like to receive payouts. This setup process takes less than a minute. Once you have submitted your application you will be redirected to the Admin Dashboard. To view your Stripe account go to Settings > Payments > Login to Stripe Dashboard.
Note: All credit card details are encrypted and stored by Stripe in accordance with PCI-compliant standards. Credit cards on file will be charged after an appointment occurs, at midnight, daily. For new accounts, Stripe requires a waiting period of 7-14 days after your first successful transaction. Once established, payouts to your account will be made daily based on your countries payout schedule. Learn more about online payments with Stripe.
Step 2 – Client Management Services
Your Secure Client Portal | Client Notifications | Private Messaging | Online Forms | Client Documents | Your Video Office

Client Portal Settings
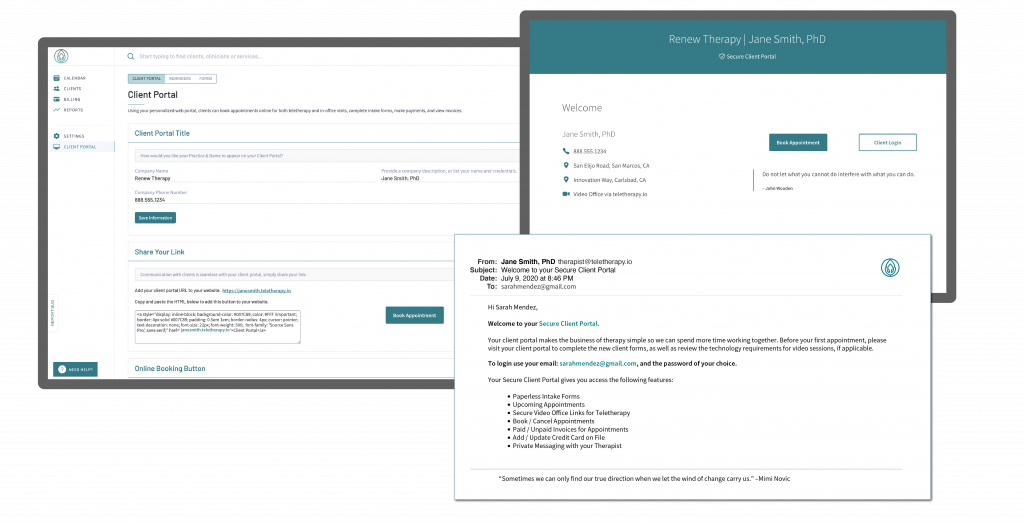
Your Secure Client Portal is already configured. Use this powerful tool to streamline client communication including online scheduling, payment, billing, intake forms, private messaging, and document sharing. To get started, simply share your personalized link with clients or add a Book Appointment button to your website.
To view your personalized client portal settings go to Admin Dashboard > Client Portal. In this section, you will see your personalized client portal link, as well as HTML code you can copy and paste to your website to display various buttons.
Easily configure your client portal to work for you.
- Enable/disable online booking
- Arrange the order of the online booking steps
- Set restrictions on when clients can book or cancel online
- Require a credit card to book an appointment
- Enable/disable private messaging
New clients will be sent a Welcome Email on your behalf explaining the features available in their Secure Client Portal. If desired, you can edit the contents of this email to include additional onboarding details specific to your practice. For more details see Client Notifications.
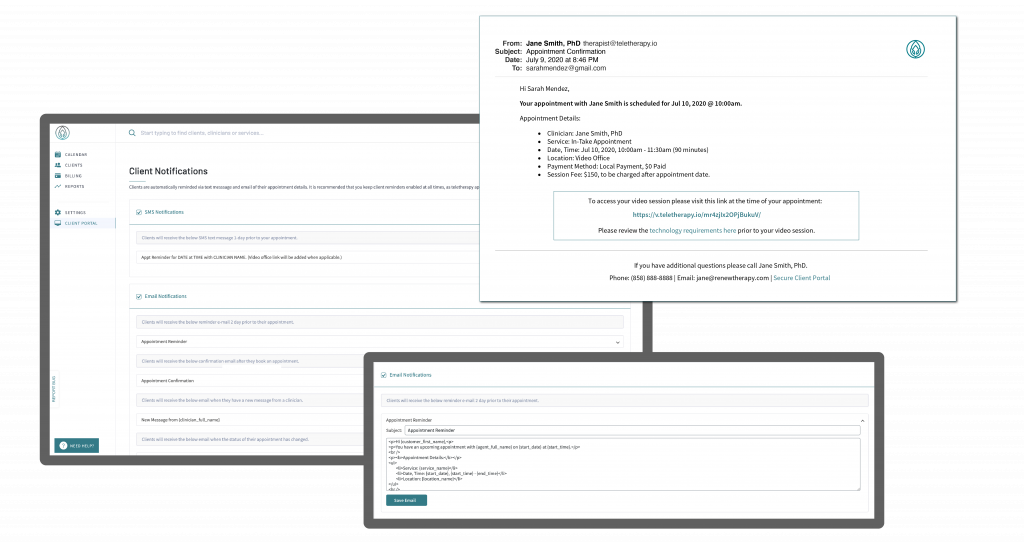
Client Notifications
Client notifications are enabled by default. It is recommended that you keep these notifications enabled, as key information is communicated to clients within each. Specifically, clients that are scheduled for Video Sessions will receive their secure video link via these notifications.
Clients receive the following Emails and SMS notifications:
Client Welcome Email (sent when new client account is created.)
Appointment Confirmation Email (sent when an appointment is booked.)
Appointment Reminder Email (sent 2-days prior to appointment.)
Appointment Reminder Text Message (sent 1-day prior to appointment.)
Appointment Cancelled or Rescheduled Email (sent when an appointment date/time is changed or cancelled.)
New Share Document Email (sent when a client share document has been added to the client’s portal.)
New Private Message Email (notification of private message via the client portal.)
Email & SMS appointment reminders are provided for your clients’ convenience. The contents of these emails are generic and do not contain PHI. If needed you can disable or edit the contents of these reminders. To view/edit or disable these notifications for all clients go to Admin Dashboard > Client Portal > Notifications. Additionally, you can enable/disable notifications by client under Client Info within the client file.
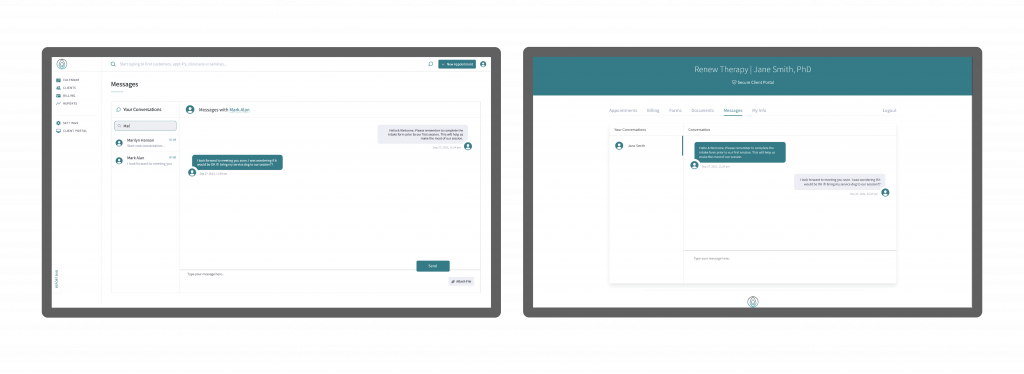
Secure Private Messaging
To send clients a Secure Private Message to their client portal, click the messaging icon located in the top right corner of your Clinician Dashboard. Here you can view all your messages at a glance, or search your client list to start a new conversation. Clients will be sent an email notification each time a private message is sent.
If you’d like to disable messaging, go to your Clinician Dashboard > Client Portal.
+ To securely share documents with your clients use the Online Forms option or the Client Share feature in Client Documents.
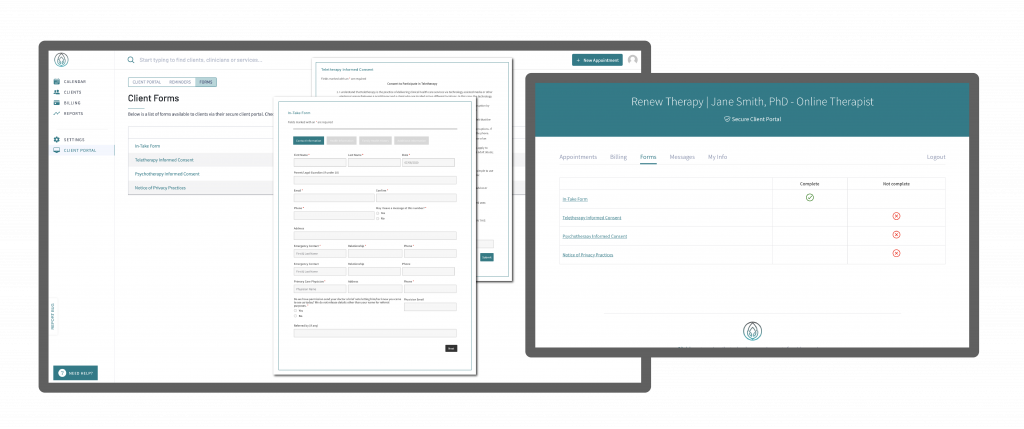
Online Forms
Online forms are automatically enabled for all clients in their secure client portal. Once a form is completed by a client, the therapist is notified via email and within the Clinician Dashboard > Client List.
To view a completed form the therapist must log in at teletherapy.io/login and go to the appropriate client record. Forms are not emailed as they contain personal health information.
We currently offer 4 online forms:
- New Client Intake
- Teletherapy Informed Consent
- Psychotherapy Informed Consent
- Notice of Privacy Policy
At this time, our default forms are not editable by the therapist. However, a teletherapy.io team member can make changes to the existing forms or add a new form on your behalf. Please send an email to make a custom form request. (Updates are typically made within 2-3 business days.)
Prefer to use your own forms? Simply upload a form in your preferred format for clients to securely download via their client portal. Once a client has completed the form they can securely upload it for your review.
To preview the available forms go to Admin Dashboard > Client Portal > Forms, and click on the title of the form. To disable a specific form uncheck the box for “Show in Client Portal” on this page.
NOTE: We encourage all clients to complete their forms online, however, we understand certain circumstances require a printable versions be made available. View Printable Form Templates
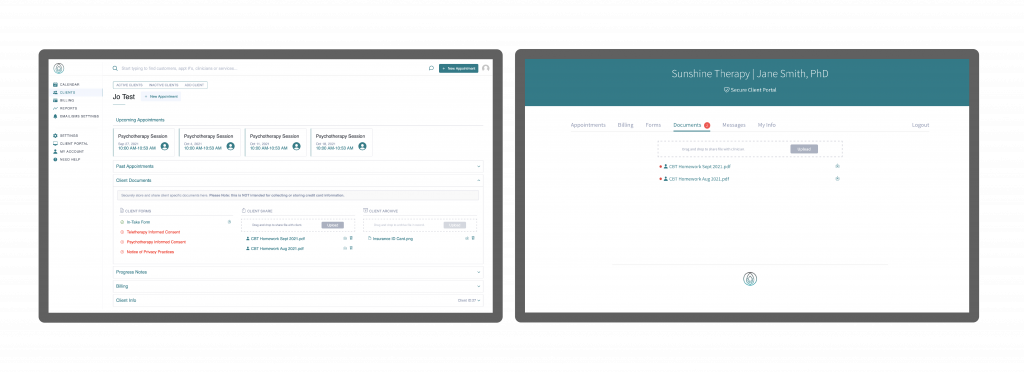
Client Documents
CLIENT SHARE: To share a document with a specific client, use the Client Share feature on the client’s page under Client Documents. This is a 2-way secure file share between the Client & Clinician. Use this feature to share documents unique to a specific client.
Clinician Dashboard: Visit the Client page and go to Client Documents > Client Share. Any document added to this section will automatically appear in the Client Portal. In addition, the client will receive an email notification that they have a new document available.
Client Portal: Clients can also upload a document to share with Clinicians via their Client Portal > Documents. Items added by a client will appear in the Client Share section of the Clinician Dashboard. Clinicians will receive an email notification as well.
CLIENT ARCHIVE: Use this option to archive client records from previous platforms, or other client-specific information you want to securely store. You can also move documents from the Client Share to the Client Archive (by dragging and dropping files) if needed. Clients will not be able to view documents in the Client Archive.
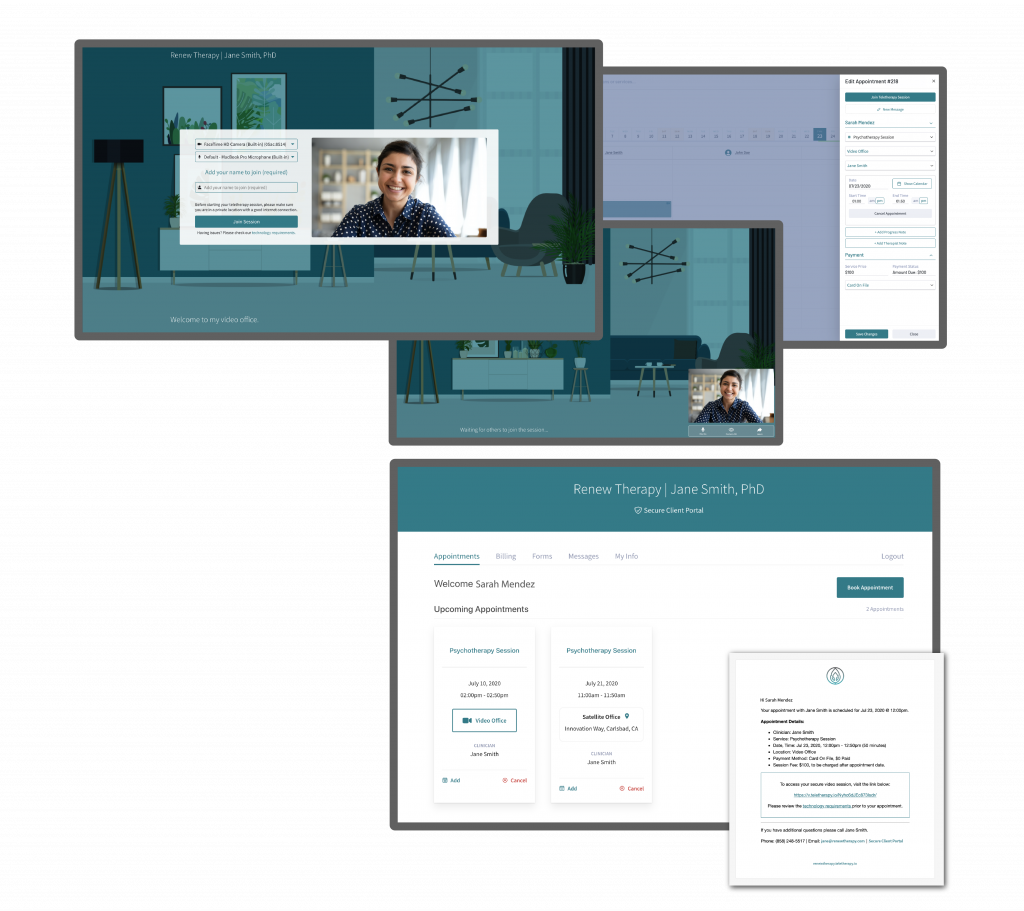
Video Office
Your video office is ready and waiting… Each session is accessed by a secure video link – no need to download any software.
Features Include:
- Secure Video: Unique link auto-generated for each session to ensure optimum privacy for clients.
- Waiting Room: Clients enter a chic waiting room area while they wait for you to join the session.
- Integrated Calendar: Easily join all your video sessions directly from your Calendar with one click.
- Screen Share: Share your screen with a simple click.
- Live Chat: Text chat during sessions as needed.
- Room Types: Select P2P or Group/Server rooms as needed to adjust for # of participants and internet quality. View Couple/Groups Counseling – to read more.
When booking an appointment, choose Video Office as your Location. Clients will be sent an appointment confirmation email that includes a secure video link to use for their session, in addition to several reminders. Clients can also access their secure video link by logging into your Client Portal.
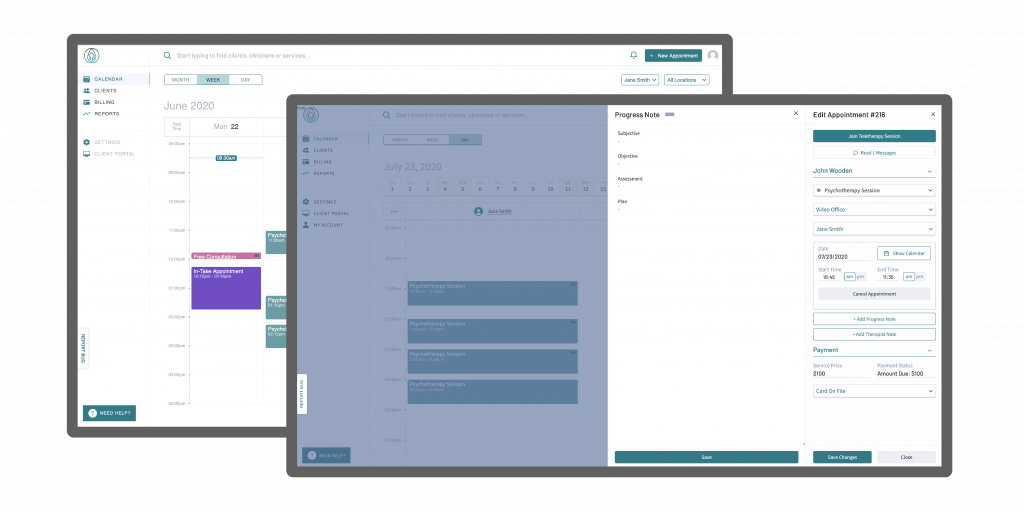
As the clinician, you will also receive an email that includes a secure video link that is unique for each session. You also have access to this in your Clinician Dashboard > Calendar. Click on the appointment in your calendar and you will see a button at the top of the Appointment slide-out – Join Teletherapy Session.
Important: For privacy and security reasons each session is assigned its own unique link – do not share links across clients/sessions. In addition, please review our technology requirements for video sessions prior to your first teletherapy appointment.
Tip: Before starting a teletherapy session, please make sure you are in a private location with a good internet connection. It is recommended that you create a professional backdrop for online sessions, and place your computer, slightly raised at eye level.
Step 3 – How to use teletherapy.io to manage your practice.
Calendar | Online Scheduling | Cancel Appointment | Therapy Notes | Adding Clients | Couple/Group Counseling | Billing & Reports | Invoices & Superbill | Stripe Payments
Calendar
Use the teletherapy.io platform to manage both your video office and in-office appointments.
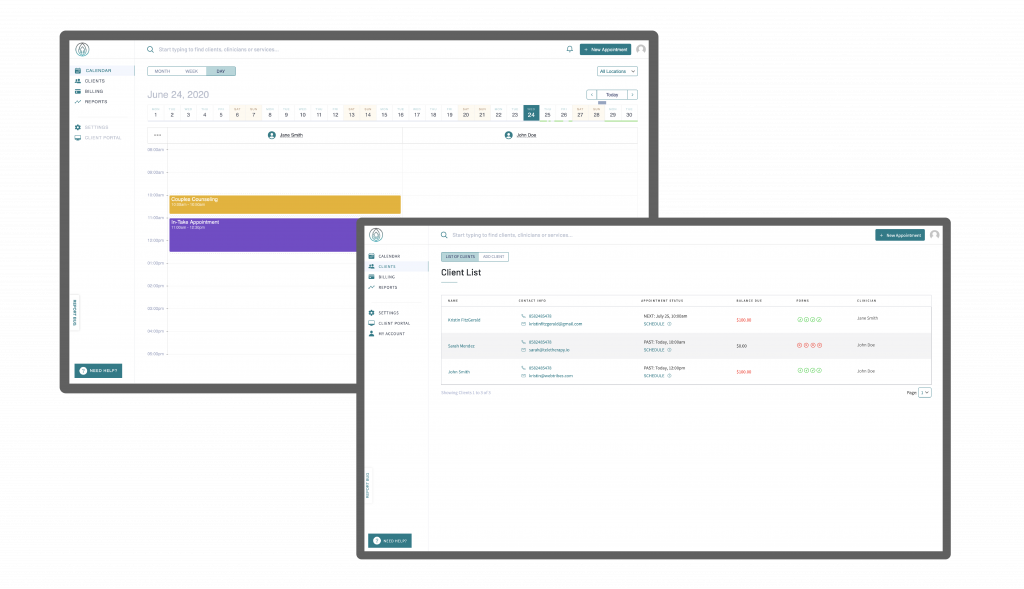
When you login to your teletherapy.io account you will be directed to your Calendar. This can be used as the control center for your practice. You can easily add / edit appointments right from your calendar view. In addition, most information is organized by appointment including therapy notes, private messaging and payment. Choose from calendar views Day, Week, Month and filter by location or clinician.
View Step-1 to learn how to set your Work Schedule.
NOTE: Appointments can be booked online by clients via your secure client portal, or directly by you via your Admin/Clinician Dashboard.
NEW! Google Calendar Sync: Sync your Google Calendar to your teletherapy.io Calendar or vice versa. This new feature can be set up per Clinician.
Step 1) Connect to Google: To add a Google Account visit your Admin Dashboard > Settings > Clinician. Choose the clinician you want to connect, then scroll to the bottom of the page to find “Google Calendar Setup.” Here you will follow the steps to “Allow” teletherapy.io to connect to your Google account.
Note: Each Clinician can login to their Clinician Dashboard to connect to their Google Accounts directly in Settings.
Step 2) Google Calendar Sync: Once connected you will see a button called “Google Calendar Sync,” this will take you to a page where you can manage which Google Events you want to Sync to your teletherapy.io Calendar and/or which teletherapy.io Appointments you want to Sync to your Google Calendar.
Note: You also have the option to Enable Auto-Sync for your Google Calendar.
If you need to Disconnect your Google Account from teletherapy.io visit Admin Dashboard > Settings > Clinician > Google Calendar Setup, and choose Disconnect.

Online Scheduling
Save time and allow clients to book appointments online. Clients can book appointments for any location, clinician, or service you add to the platform.
There are several ways to access online scheduling:
- Book Appointment button on your website. To add a Book Appointment button to your website copy and paste the HTML code provided, and add it to the desired location. Or, simply add a link to your client portal from your website menu bar. Clients will be directed to your client portal to schedule and pay for their appointment online.
- Book directly via your Secure Client Portal. If you don’t have a website, you can direct clients to your Client Portal. New clients will receive a welcome email explaining the benefits and features of your Secure Client Portal. They will be prompted to create an account, as well as utilized the features available to them online.
- Book Appointments via teletherapy.io. If you prefer, you can book an appointment on your clients’ behalf within your Teletherapy.io Clinician Dashboard. Simply select the desired date and time from your calendar and add the required appointment details.
Notifications: Clients will be sent a confirmation email once an appointment is scheduled. They will also receive appointment reminders 1 and 2 days prior. View Step-2 to learn how to configure your client portal and client notifications.
Note: If you do not want clients to book appointments online you can disable the Book Appointment button from your Client Portal in your Admin Dashboard > Client Portal > Uncheck Online Booking.

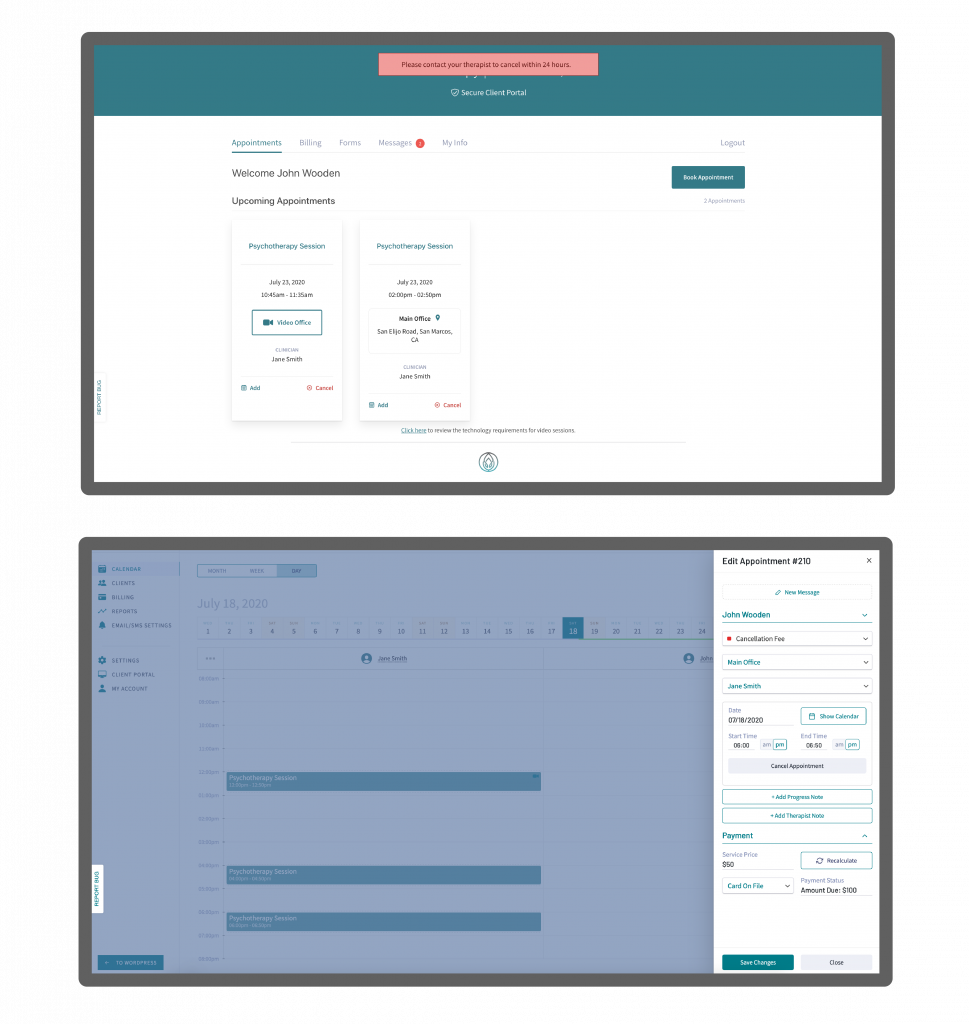
Cancelling/Rescheduling Appointments
Clients have the option to cancel their appointment via their Secure Client Portal. If an appointment is cancelled by a client you will receive an email notification, and the appointment will be removed from your calendar. However, if a client attempts to cancel an appointment within 24 hours, the system will not let them cancel directly. Instead, they will receive the message “Please contact your therapist to cancel within 24 hours.”
As a clinician, you have the option to cancel or reschedule an appointment in the Clinician Dashboard at anytime. Simply click on the appointment in your calendar, and a slide-out will appear on your screen. Here you will see the option to Cancel Appointment or simply adjust the appointment date/time as needed and Save Changes. The system will then send an email to your client with notice of cancellation or the rescheduled date/time as well as adjust any upcoming appointment notifications.
If you charge a fee for Late Cancellations or No-Shows, do not cancel the appointment. Instead, you will click on the appointment to open the slide-out and change the service to “Cancellation Fee.” This will remove the appointment from your availability calendar but also allow your billing and client invoices to reflect the proper charge and description. If your client has a credit card on file, the system will auto charge their card for the amount due that night between midnight and 2 am.
To set your cancellation fee go to Admin Dashboard > Settings > Services. Edit the service called “Cancellation Fee,” to reflect your desired Service Name & Price and Save Changes. If needed, you can adjust the price per appointment directly on the appointment slide-out.
Therapy Notes
It is easy to add notes to your therapy appointments. Once an appointment has been booked, you will see the option to add a Progress Note or Therapist Note within the appointment slide out.
Simply click on the appointment in your calendar and you will see an Edit Appointment slide-out appear. To add a note, click the + Add Progress Note or, + Add Therapist Note button to open a free form text area to record your session notes. Or use the “Copy Previous” button to bring text over from your last note with a client.
Don’t forget to save your note. You can return to the appointment at any time to review or edit these notes. Or visit your Client Record to view and or/print your past progress notes.
Progress Note: This note is included as part of the client’s record and provides details about the client such as diagnosis and assessment, symptoms, treatment, and progress towards treatment goals. Typically they follow a standard format (e.g., SOAP, BIRP, etc.) but a Simple Note is acceptable too.
Therapist Note: (a.k.a Psychotherapy Note) This note is private to the therapist. These notes may contain observations, impressions, and other details about the session. These types of notes have special protection under HIPAA and are NOT contained in the client’s record. These notes do not follow a standard format and are stored separately.
Note: Progress Notes are currently available in an open-ended free form format. We do not offer templates at this time. However, this format does allow you to copy and paste and format your notes anyway you choose.
Tip: See all notes for a single client in the client record under Progress Notes. Notes are formatted in PDF for easy printing or sharing. Or, quickly view what appointments still need notes under the Billing tab, appointment list.
Adding Clients
To add a Client to the platform simply login to your Admin Dashboard, and go to Clients > Add Client. The only information needed is a name, email, DOB, and phone number. Adding a client via your Admin dashboard will generate an email to the client prompting them to set a password as well as, instructions on how to login to your Secure Client Portal.
Or, you can direct your clients to your Secure Client Portal to create an account or book an appointment (this will also create a new account in the system.)
Each new client will receive a welcome email explaining the features available to them in their secure client portal, as well as any additional details you would like to add. View Step 2 to learn more about how to customize your client notifications.
Once a client is in the system, you can upload documents, add a secondary email, view completed intake forms, schedule appointments, review billing details and more in the Admin Dashboard > Clients > Client List. Select their name from this list to view their detailed Client Record. Or, you can use the search bar at the top of your Dashboard to find them quickly.
Note: Clinicians can add new clients to the platform in their personal Clinician Dashboard. However, if a client is already in the system the Therapist Admin will need to assign the Clinician to the client in the Admin Dashboard > Client Info > Primary Clinician. Or, if an existing client uses the Client Portal to Book an Appointment with a Clinician, this will add the client record to the Clinician’s account.
Couple / Group Counseling
For couple/group appointments you have a few options, depending on what works best for you or your client. The system manages a couples/group counseling session the same as it does an individual therapy session.
Online Booking: The client that books a “Couple Counseling” or “Group Counseling” session online will be the primary account holder and therefore responsible for scheduling and payment. However, the client can add a secondary email address to their contact information via the client portal should they want another person to receive appointment reminders and updates.
Clinician Dashboard: As the Clinician you can choose how best to organize your client records. You can create an account for the couple: (Jack & Jane Smith) or separate accounts for each person: Jack Smith & Jane Smith, or all three. But understand all accounts require a primary email address that is unique. However, you can also add a secondary email address that is not unique to each account so 2 people can receive appointment confirmation and reminder emails for a single appointment.
** If you are conducting the Couple/Group session via Video Office, you or the client that booked the session, will need to share the session link with all parties involved in the session. This session link will be emailed to both the primary and secondary email address on file prior to the session date/time. Clients can also login to the Client Portal to join the session.
We offer two room types for video sessions. Once you schedule a video session you will be given the option to select a room type. See the toggle switch near the top of the appointment slide-out.
- PEER-TO-PEER (P2P): Use this room for sessions with up-to 3 participants with good internet connections. This room type is free / included in your monthly subscription.
- GROUP / SERVER ROOM: Use this room for large groups sessions up-to 50, or for participants with poor internet connections. This room type is an additional fee of $0.24 per participant / per hour.
** Switch room type anytime. Simply return to the appointment to make a switch. This will refresh a session but keep the same link connection.
For couple or group sessions within the same household, we recommend you share a device or laptop. Multiple devices on the same WiFi can cause issues. Visit our technology requirement to learn more.
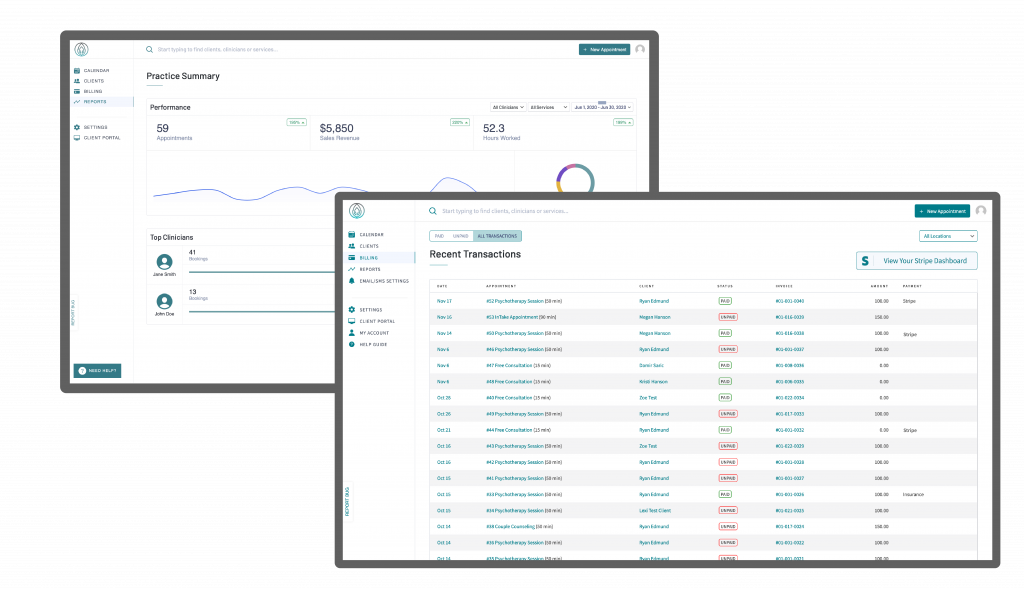
Billing & Reports
Teletherapy.io makes it easy to track payments with its Billing & Reporting tools.
- Recent Transactions: Quickly view the payment status of all your past appointments in your Admin Dashboard > Billing – view appointments by Paid, UnPaid and All Transactions.
- Practice Summary: To view a summary of your practice including total appointments, revenue accrued & paid, and hours worked, visit the Reports tab and select the Services and Dates you want to view.
- Custom Reports (CSV file): Visit the Reports tab to create a custom transactions report by Clinician, Location, Payment Method & Date.
When booking an appointment, you must designate a Payment Method. There are two options for categorizing appointment payment method: 1. Card on File (with Stripe) or 2. Local Payment (not Stripe).
1) Card On File (Stripe): Once you connect Stripe to your teletherapy.io account you can begin accepting credit card payments online from clients. All appointments that are assigned the Payment Method “Card on File” will automatically be charged at midnight the day the appointment occurs. Once payment is processed, you will see these appointments listed in your Admin Dashboard > Billing > Paid Transactions marked PAID. This is your most integrated payment option.
Clients can securely add their Card on File two ways:
- Login to their Secure Client Portal > Billing > Add Card on File.
- Add a Card on File during the Online Booking process.
2) Local Payment: If you accept payment directly, not via Stripe, you will want to use the + Add Transaction feature to mark an appointment as PAID in the system. Simply click on the Appointment in your Calendar to open the Edit Appointment slide-out, then scroll down to the Payment section. Check that the Payment Method for your appointment is set to Local Payment and you will see the option to + Add Transaction. Add the amount, method, click Add Transaction and you will see a note in the payment area of the appointment. Save Changes to the appointment, then go to your Billing > Paid Transactions to see this appointment listed as PAID.
Multiple Payments: The system can track multiple transactions and multiple payment methods for a single appointment. This can be useful for certain use cases.
- For example, if you accept Insurance you can use the billing system to collect a co-payment via Stripe by setting the appointment to reflect the co-payment amount due (ex $40) and choosing Payment Method: “Card on File.”
- Once you receive payment from the Insurance Company, return to the appointment and adjust the Service price to reflect the total price (ex $100) and change the Payment Method to “Local Payment.”
- Use the + Add Transaction feature to record the Insurance payment received (ex $60) and the system will automatically calculate the new total (ex $100) and mark the appointment as PAID.
Custom Fee: Set a custom fee by client in the client record under Client Info. This custom fee will override your standard service fee for this client only. Please note: this feature only changes the fee for appointments not yet scheduled. Previously scheduled appointments, even for a future date, must be updated individually.
To change the fee for a single appointment, select the appointment, update the Service Price and Save Changes.
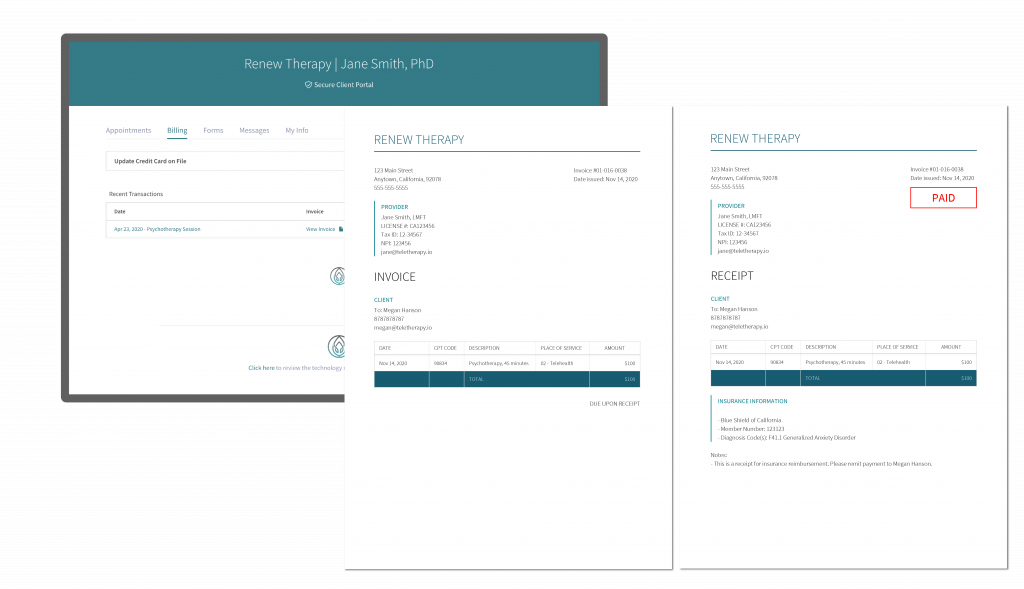
Invoices & Superbill
Teletherapy.io has automated the Invoice and Superbill process for you. No more time spent creating and emailing Invoices to clients. Invoices are automatically generated and available to clients via their Secure Client Portal. To view Invoices in your Admin Dashboard go to Billing > All Transactions or visit the Billing section for each Client Record.
- Once an appointment has occurred an INVOICE is created.
- Once an appointment has been PAID, the invoice is marked PAID and becomes a RECEIPT.
Superbill: Depending on what information you choose to include, this RECEIPT can be used by clients for Insurance Reimbursement – aka Superbill.
To make your billing SUPER, follow these steps:
1) Complete the following fields in your Admin Dashboard > Settings, as applicable to your practice:*
- Locations > Place of Service Code (i.e. 02 – Telehealth, 11 – Office)
- Services > CPT Code + CPT Description (i.e. 90834 – Psychotherapy, 45 minutes)
- Clinicians > NPI Number + TAX ID Number + License Number + Invoice Notes (Supervisor Name, or any additional info to be added to all Invoices.)
*NOTE: You will only need to complete these fields once; they will automatically be applied to all Invoices.
2) Add Client specific information in the Client Info section, as applicable to your clients:*
- Insurance Company
- Member #
- Date of Birth
- ICD-10 Diagnosis Code(s) – to add multiple, separate by a comma.
- Invoice Notes: (i.e This is a receipt for insurance reimbursement. Please remit payment to Client. Or, any additional info to be added to a specific Client Invoice)
*NOTE: These fields are unique to each client and will only appear on the Invoice if they have been completed AND the appointment has been marked PAID.
Adding CPT Codes by Appointment
There are 2 options for adding CPT codes & descriptions —at the Service level and at the Appointment level.
- To save time, add your most common CPT codes & description to your Services. This will auto-populate all new appointments with these default CPT codes.*
- If a particular Appointment needs a different CPT code, simply edit and save the new CPT code & description for that single appointment.
This flexibility allows you to keep your Service list brief and still add accurate CPT codes to each appointment as needed. This option will be particularly useful for certain Services such as Family Psychotherapy where different CPT codes may apply to an appointment depending if the client attends the session — i.e. 90847 vs 90846.
*Note: Past appointments will not be auto-populated with CPT codes added at the Service level. To add a CPT code to a past appointment you will need to edit the appointments individually.
Stripe Payments – Accepting Credit Cards Online
To accept online credit card payment you must first connect a Stripe account. All credit cards details will be encrypted and stored by Stripe. Credit cards on file will be charge after an appointment occurs, at midnight, daily. To connect to Stripe go to Settings > Payments > Connect to Stripe.
Why Stripe? Stripe has quickly become the top online credit card processor due to its high level of security, reliability and competitive rates.
Transparent processing fees
– 2.99% + $0.39 per successful transaction
– No fees for refunds.
With Stripe, you can charge almost any kind of credit or debit card:
- US businesses can accept Visa, MasterCard, American Express, JCB, Discover, and Diners Club.
- Australian, Canadian, UK, businesses can accept Visa, MasterCard, and American Express.
- FSA and HSA cards for client payments.
Payout Schedule
For new accounts, Stripe requires a waiting period of 7-14 days after your first successful transaction. It is recommended that you process a test transaction of $1 to get this process initiated quickly. Once your account is established, payouts to your account will be made daily based on your countries payout schedule.
Accounts in the United States & Australia, payouts of your available balance are made daily and contain payments processed two business days prior (this is how long it takes for your pending account balance to become available). For example, payments received on a Tuesday are paid out by Thursday, and payments received on a Friday are paid out by Tuesday.
Note: Payouts are affected by Federal holidays.
Accounts in CA (Canada) & UK (United Kingdom), payouts of your available balance are made daily and contain payments processed seven calendar days prior (this is how long it takes for your pending account balance to become available).
Note: This is based on location, not currency.
© 2023 teletherapy.io